The short answer to the question, “Can you tile over drywall?” is yes. However, that answer needs to be qualified, as just because something can be done does not necessarily mean that it should be done. I can have 3 bowls of ice cream for breakfast every day for the next year, but I’m pretty sure that for health reasons I shouldn’t.
That being said, there are instances when tiling over gypsum wallboard is completely acceptable, and other instances when it is not advised.
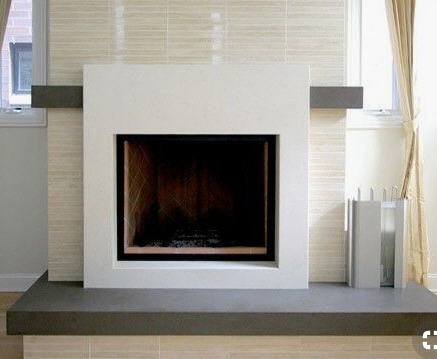
It will be fine to tile over drywall in low-moisture areas, such as tiling around a fireplace. In areas of high moisture, such as walls in a shower, for long term durability, it is NOT advised to install tile over drywall, even if the drywall is Type MR, moisture resistant. In areas that are exposed to an abundance of moisture, it is better to install a cement board as a backer rather than a gypsum board. Two very common cement board brands are Hardi Backer and WonderBoard. Both are readily available at most building supply centers.
Besides fireplace surrounds, another area where it is common to see tile installed directly to drywall is the kitchen backsplash. You might be thinking that a backsplash area is a very wet area, however, that is usually not the case.
With the advent of under-counter dishwashing machines, the sink areas of kitchens do not get nearly as wet as they did back in grandma’s days.
Now that we have established the basis of where it is permissible to tile over gypsum board and where it is not advisable, let’s move on to some guidelines on the proper methods of doing so.
How To Properly Tile Over Drywall
First off, the drywall to which you will be tiling over must be clean, dry, and in excellent condition. If your plan includes removing old tile and replacing it with new, you are likely going to have to do do some work to restore the gypsum board to excellent condition.
When existing tile is removed from drywall, it is nearly impossible to not damage the face of the gypsum board. What normally happens is some of the paper facing gets torn off as is illustrated in this photo:
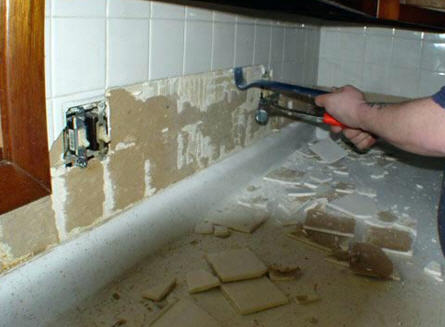
Notice in the above photo that some of the paper facing of the wallboard has been torn off, as can been seen by the brown color. Additionally, you can clearly see that the facing from the wallboard is still stuck to the back of some of the tiles. The surface in the above photo where the tiled has been removed is not yet ready to receive new tile.
There will be several steps that must be done in order to prepare wallboard as in the above photo to be ready to tile over.
First, you must scrape all the leftover mastic or tile adhesive off. The surface needs to be smooth. Second, you must peel off any loose paper facing from the gypsum board. Leaving loose paper can cause problems after the tile has been installed. Basically what happens is the mastic attaches the new tile to the paper facing of the gypsum board, but if that paper is loose and not adhered to the board, then the tile can easily fall off. It is very important to take the time to peel off paper facing that is loose.
Next, you must skim coat the area of drywall that was damaged with joint compound. Let dry and give it a light sanding to make it smooth. You’re almost ready at this point to begin tiling, but there is one last step. You must now seal the gypsum board with a high quality sealer. We like using Sherwin Williams PVA Primer/Sealer (PVA is short for polyvinyl acetate).
Once you have sealed the area that you intend to tile, let dry and you are ready to begin the tiling process.
Now, let’s address an existing wall that does not yet have any tile. Again, the wallboard must be clean, dry, and in excellent condition. It must have paint (or sealer if new drywall) on it. If the paint is a gloss or semi-gloss, it is a good idea to give it a light sanding to remove the shine. This will help increase the adhesion of the mastic or tile mortar.
Now that we covered what you need to know regarding the drywall, you’re ready to begin tiling. That’s not our are of expertise, so we suggest following the guidelines from SFGate.com:
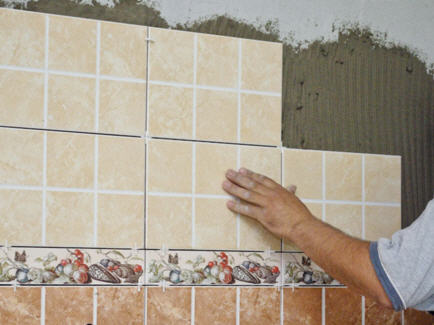
Measure the width of the wall and divide the number by two to find the center. Measure across the wall the length of the divided number and place a mark. Place a 48-inch spirit level vertically on the line. Check that the center bubble is within the etched lines, which means it is plumb, and scribe along the level edge with a pencil.
Measure the height of the tile with a tape measure. Measure up from the bottom of the wall the height of the tile. Add another 1/8 inch to the height measurement and place a mark on the vertical line. Place the level horizontally on this line and scribe a line for the first course of tile.
Apply a thin layer of mastic or thin-set mortar below the horizontal line using a grooved trowel. Move the trowel straight up to produce vertical ripples of mastic or mortar. Set the first tile next to where the vertical and horizontal lines meet on the wall. Line up the tile edges with the vertical and horizontal marks on the wall to ensure that they’re level and plum.
Set the second tile next to the first, sandwiching two 1/4-inch spacers in between for even spacing. Check the upper edge to make sure it lines up with the horizontal line. Continue placing the first course of tiles in the same manner using spacers. Place strips of blue painter’s tape over the tile face, sticking each end to the wall to prevent the tiles from sliding or falling off as the mastic sets. Allow the mortar or mastic to sit for at least 12 hours to set properly.
To follow the complete instruction on how to tile over drywall from SFGate.com, you can read their guide here.